


Screen Printing Mesh: Technology and Application
From polymer chains and loom tension to snap-off dynamics — how one piece of mesh decides what you can print.
Mesh is the only component in screen printing that plays three roles at once: it carries the image, it meters the ink, and it acts as the elastic element that peels the screen off the substrate. Those roles pull against each other. Finer detail demands a higher count, which passes less ink; more ink demands a coarser count, which is harder to keep under tension. This book sets out the numbers behind that conflict so that mesh selection becomes a calculation rather than an experiment.
- 1 Materials: why polyester won3 materials
- 2 Weaving and finishing: yarn to screen5 steps
- 3 Geometry: count, open area, ink volume4 formulas
- 4 Mechanics: tension, creep, snap-off3 curves
- 5 Chemistry: resistance and adhesion3 systems
- 6 Selection: work back from the printdecision tree
- 7 Applications: seven industries7 sectors
- Appendix Formulas and checklistsquick reference
1 Materials: why polyester won
Screen printing mesh has passed through four materials: silk, nylon (polyamide, PA), polyester (polyethylene terephthalate, PET), and stainless steel. Each replacement was driven by the same conflict — dimensional stability and compliance cannot both be maximised.
Silk is the oldest option. The protein fibre wets out well and feels soft, but it degrades in the strongly alkaline developers used for stencil making, and batch variation is large. Nylon replaced silk in the mid-twentieth century: better abrasion resistance, faster recovery, suited to curved surfaces. But the amide groups in polyamide form hydrogen bonds with water. Moisture uptake sits at 3–4.5%, so a 10% change in relative humidity can shift dimensions by around one part in a thousand — fatal for multi-colour registration. Polyester took over from the 1970s. Its semi-crystalline structure gives high modulus and low moisture uptake (0.2–0.5%), which is the best available balance of tension, accuracy and cost. Stainless steel exists for extreme precision and long runs: no moisture uptake, high modulus, almost no creep, at the price of cost, brittleness and the impossibility of repairing a crease.
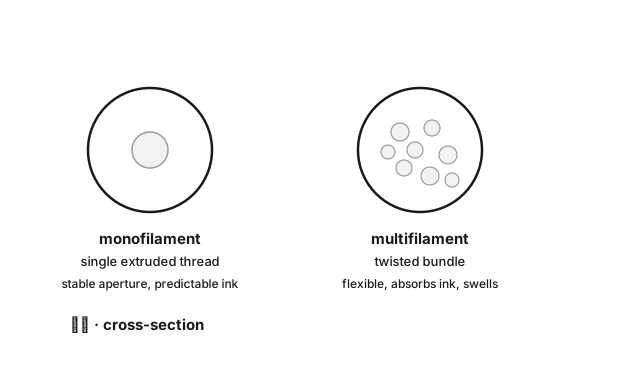
There is a second structural distinction: monofilament versus multifilament. A monofilament is a single extruded round fibre, diameter tolerance typically ±2 μm, woven into square apertures with calculable ink volume. Multifilament twists several fine fibres into one strand: compliant, ink-absorbent, good on curved or rough substrates, but the twist changes under pressure and the aperture distorts with it. Apart from a few special processes, screen printing uses monofilament.
| Property | Polyester PET | Nylon PA | Stainless steel |
|---|---|---|---|
| Moisture uptake | 0.2–0.5% | 3–4.5% | 0 |
| Elastic modulus | medium (~5–10 GPa) | low (~2–4 GPa) | high (~190 GPa) |
| Elongation at break | 15–30% | 20–40% | 3–8% |
| Creep tendency | medium | high | negligible |
| Strong alkali | poor (hydrolysis) | good | good (chloride pitting) |
| Common organic solvents | good | good | good |
| Typical use | general, textile, packaging | curved, rough, elastic substrates | PCB, solar, glass, fine lines |
The dividing line is clear: if registration must hold tighter than ±0.1 mm, or the substrate is rigid and the run is long, specify stainless steel. For almost everything else, polyester is the default. Nylon earns its place only when the substrate itself deforms and the screen must follow it — some footwear surfaces, ball printing.
2 Weaving and finishing: yarn to screen
Two rolls of mesh both marked 150 count can differ by eight percentage points of open area, and therefore by a fifth of their ink volume. The difference is not the polymer. It is the finishing line. Understanding each step explains why the datasheet reads the way it does.
2.1 Weaving
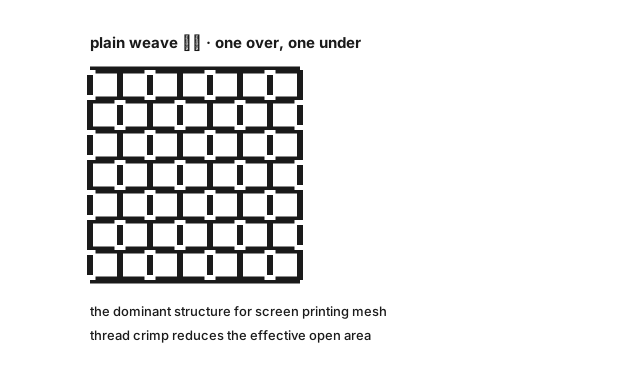
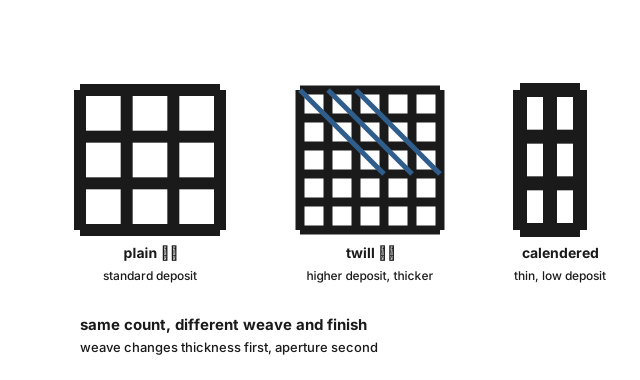
Screen mesh is mostly plain weave: warp and weft alternate one over, one under. Plain weave is dimensionally stable, gives square apertures and predictable thickness. The cost is crimp — every thread undulates over and under its neighbour, consuming open area. This is the first reason measured open area always falls below the geometric ideal.
Twill weave lets a warp thread pass over two or more wefts. Crimp is lower, the fabric is thicker, and ink volume per unit area is higher. It suits work that needs a heavy deposit — some signage, thick-film circuits. The cost is an irregular aperture, which shows up as ragged edges on fine lines.
2.2 Heat setting
Freshly woven fabric carries the internal stress left by the loom. Heat setting at 150–180 °C allows the molecular chains to reorient and the stress to relax, so apertures do not keep moving once the screen is stretched. Under-set mesh loses 3–5 N/cm within 24 hours of being tensioned to 20 N/cm, and registration drifts with it.
2.3 Calendering
Calendering passes the fabric between heated steel rolls and presses the threads flatter. Two purposes: lower TIV (less ink, flatter thin films) and a smoother surface for emulsion adhesion. Calendered mesh measures about 1.5–1.7 thread diameters thick against 1.8–2.0 for uncalendered. Precision work — PCB solder mask, membrane switches — uses calendered mesh as standard.
2.4 Dyeing
Mesh comes white or yellow (amber). The colour is functional: during exposure, UV scatters inside white threads and softens the edge of fine detail. Yellow mesh absorbs short-wavelength UV, scattering less, so fine lines and dots reproduce better. As a rule of thumb, use yellow above 200 count, or whenever dots below 3% must hold.
2.5 Surface treatment
Emulsion adheres by mechanical anchorage. A smooth filament gives the stencil little to grip, and the emulsion lifts during development or mid-run. Roughening — chemical etch or plasma — creates micron-scale topography and can multiply adhesion several times over. This step is routinely skipped, and it is the first determinant of screen life.
3 Geometry: count, open area, ink volume
This is the calculation core of the book. Four formulas turn “how fine can this mesh print, and how much ink will it lay down” from an estimate into a calculation.
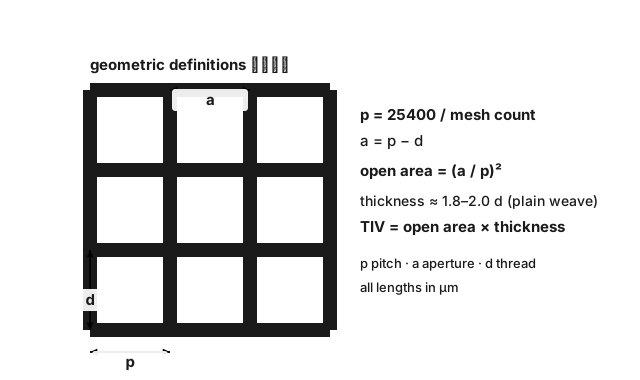
Worked example, 150 count with a 48 μm thread:
That 46.7 is a ceiling, not a delivery figure. Ink actually transferred to the substrate is typically 30–50% of TIV, depending on viscosity, squeegee speed, hardness and angle, and how absorbent the substrate is. So TIV is best used to compare the relative ink capacity of different meshes, not to predict an absolute film thickness.
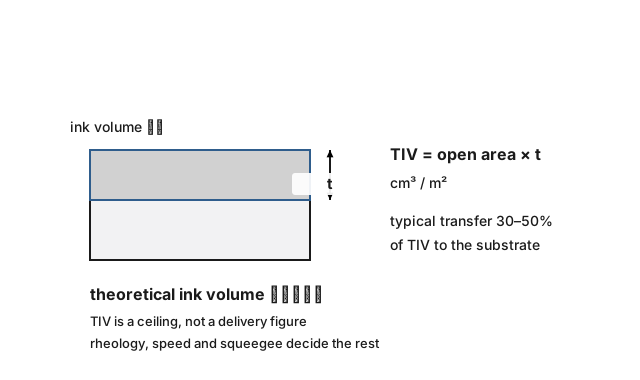
| Count /inch | Thread μm | Pitch μm | Aperture μm | Open area | TIV cm³/m² | Typical use |
|---|---|---|---|---|---|---|
| 80 | 80 | 317.5 | 237.5 | 56% | 72 | heavy ink, textile base |
| 110 | 80 | 231.0 | 151.0 | 43% | 52 | textile, plastisol |
| 150 | 48 | 169.3 | 121.3 | 51% | 47 | general, packaging |
| 180 | 48 | 141.1 | 93.1 | 44% | 35 | labels, film |
| 200 | 40 | 127.0 | 87.0 | 47% | 32 | fine graphics |
| 250 | 34 | 101.6 | 67.6 | 44% | 25 | glass, ceramic |
| 305 | 34 | 83.3 | 49.3 | 35% | 18 | PCB, membrane switch |
| 355 | 25 | 71.5 | 46.5 | 42% | 14 | solar fingers |
Three common misreadings. First, nominal count carries a tolerance; 150 from two suppliers can differ by 3–5 threads, so re-verify when changing supplier. Second, warp and weft density may differ, especially on wide fabric — the nominal count usually refers to the warp, so align the registration-critical direction with the denser axis. Third, open area is not a length ratio: (a/p) and (a/p)² differ by 30% when a/p = 0.7, and using the wrong one inflates every ink estimate.
4 Mechanics: tension, creep, snap-off
Mesh is elastic, and that is the fundamental difference between screen printing and every other process: ink is forced through apertures, and the screen must peel away the instant the squeegee passes. When and how fast it peels decides whether the edge is sharp or smeared.
4.1 What tension means
Tension is quoted in N/cm — force per centimetre of mesh width. More is not better. Tension sets the screen’s recovery frequency, and that frequency has to match squeegee speed. Too low and the screen recovers late, dragging ink and fraying the edge. Too high and the mesh sits near its elastic limit; the screen relaxes sooner and drifts earlier.
| Material / count | Tension N/cm | Notes |
|---|---|---|
| Polyester 80–120 | 18–25 | coarse threads carry higher load |
| Polyester 150–200 | 15–22 | the common working range |
| Polyester 250–305 | 12–18 | thin threads break if over-tensioned |
| Stainless 250–400 | 25–35 | high tension is the premise of fine registration |
| Nylon 100–200 | 15–20 | creeps visibly; allow compensation |
Measure at the centre. Tension is always higher near the clamps because of the grip effect. If centre tension varies by more than 2 N/cm across a batch, multi-colour work will misregister in a way that tracks the colour sequence.
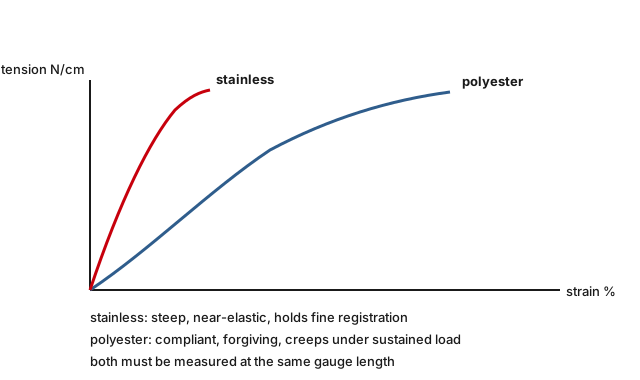
4.2 Creep: the most underrated variable on the floor
Polyester continues to extend slowly under constant load. A screen tensioned to 20 N/cm may read 17–18 N/cm after 24 hours at rest, and 15–16 N/cm after a week. Creep roughly doubles for every 10 °C rise. Humidity matters little for polyester and a great deal for nylon.
This explains a familiar production pattern: registration is correct on Monday morning and drifts by Wednesday. The machine has not changed; the screen has relaxed. Three countermeasures — rest tensioned screens for 24 hours before use, re-measure and re-tension mid-run on long jobs, or specify stainless steel.
4.3 Snap-off dynamics
As the squeegee passes, the mesh is pressed into contact with the substrate and stores elastic energy. When the squeegee moves on, the mesh releases that energy, peels away, and shears the ink thread so it stays on the substrate. The four stages are shown in Figure 7.
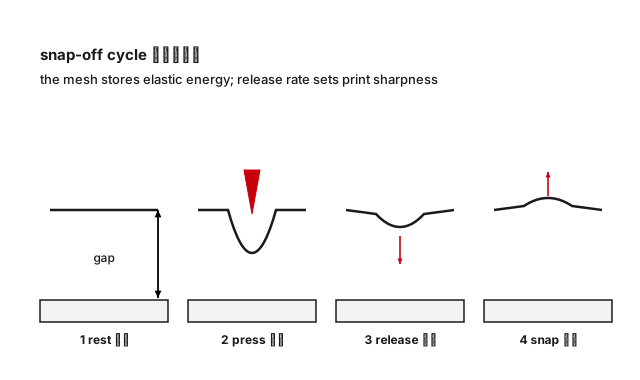
Off-contact distance is the core parameter of this system. Too small and the screen cannot release in time, so the print smears. Too large and you need more squeegee pressure, which distorts the screen and lengthens the return travel. The working rule is off-contact at roughly 0.5–1% of the screen’s short side, commonly 1.5–3 mm for mid-range counts. High-tension screens tolerate a smaller gap — one reason stainless mesh prints faster and cleaner.
5 Chemistry: resistance and adhesion
Mechanical properties are printed on the datasheet; chemical compatibility usually is not. This chapter splits it into three questions: will the ink solvent attack the mesh, will the cleaning agent attack it, and will the emulsion let go?
5.1 Polyester: fears alkali, not solvent
PET is a polyester built on ester bonds. It is stable in most organic solvents — esters, ketones, aromatics, alcohols — which is exactly why it works with the majority of screen inks. But ester bonds hydrolyse under strong alkali, and the symptom is embrittlement, loss of strength, then broken threads. So: do not soak screens in strong alkali during development or reclaiming, and never hot. Use neutral or mildly alkaline cleaners, rinse immediately, dry thoroughly.
Temperature accelerates everything. Alkaline solution above 60 °C attacks PET several times faster than at room temperature. Shops that wash screens in hot caustic see no problem for months, then screen life collapses after a few hundred cycles.
5.2 Nylon: alkali-resistant, water-hungry
Amide bonds resist alkali better than ester bonds, but moisture uptake is high, with two consequences: reversible swelling and partly irreversible loss of strength. Nylon is a poor choice where registration matters and irreplaceable where the screen must follow a curved surface.
5.3 Stainless: nearly inert, except to chloride
Stainless is inert to almost every screen solvent, resists alkali, and tolerates heat. Its one weakness is halide ions: chlorine-bearing cleaners, or prolonged contact with chlorinated water, cause pitting that starts at the thread surface and eventually breaks it. Deionised water and no chlorine disinfectants is the rule for long stainless screen life.
5.4 Why emulsion lets go
There is no chemical bond between emulsion and mesh. Adhesion is mechanical anchorage: emulsion flows into microscopic pits on the thread, cures, and keys in. Three factors govern it — surface roughness, cleanliness, and degree of cure.
Cleanliness is the usual culprit on the floor. Weaving lubricants and incompletely reclaimed emulsion leave a weak boundary layer, and the stencil lifts in sheets. The correct order is degrease (alkaline or solvent) → rinse → roughen if the mesh is not pre-roughened → dry → coat.
A counter-intuitive conclusion: short screen life is more often a dirty mesh problem than a bad emulsion problem. Check degreasing and roughening before buying a more expensive emulsion.
6 Selection: work back from the print
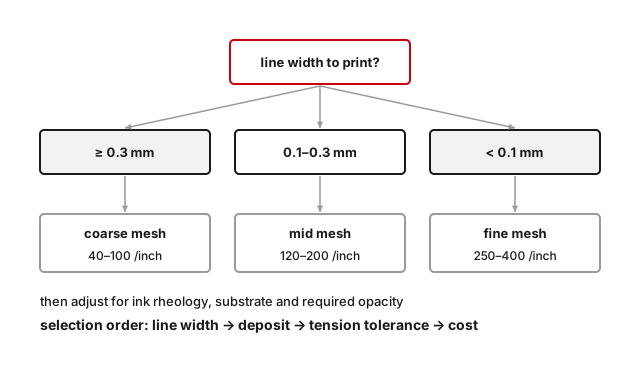
Every formula so far runs forward: given a mesh, what can it print. Real work runs backwards — you hold a print and need to know which mesh produces it.
6.1 First constraint: finest line
The finest line that prints reliably is roughly two to three thread diameters wide. The reason is physical: below that, the aperture cannot form a continuous channel across the image area, so ink volume collapses and the edge goes ragged.
For a 0.15 mm line, d must not exceed 60 μm, which means around 200 count (40 μm thread) or 180 count (48 μm). For a 0.5 mm line or a solid area, an 80 μm thread at 110 count is enough and delivers more ink.
6.2 Second constraint: required film thickness
Work back from the target dry film. If dry thickness is h (μm) and ink solids are s, the wet volume needed is about h/s. Compare that with TIV in Table 2 and choose the mesh that meets the requirement without overshooting. Excess ink brings drying problems, slumped edges and wasted material.
6.3 Third constraint: registration
For multi-colour work tighter than ±0.1 mm, favour stainless steel with high tension (25 N/cm and above) and calendered mesh. Even when polyester starts at the right tension, creep consumes about half the margin across a long run.
6.4 Fourth constraint: run length
Above roughly a hundred thousand impressions, stainless steel wins on cost per print despite the higher unit price. For short runs, many variants and frequent changeovers, polyester is more economical. This is a purely financial judgement, independent of print quality.
The most common selection error: choosing by count alone and ignoring thread diameter. Two 150-count meshes at 48 μm and 34 μm differ by nearly 30% in TIV — completely different ink delivery. A specification must state count and thread diameter together.
6.5 Fifth constraint: mesh angle
One last variable costs almost nothing and is routinely ignored: the angle of the mesh relative to the artwork. Mesh is a periodic structure and so is a halftone dot. Superimpose two periodic structures and you get moiré — visible as a banded pattern across the print that reads like ripples on water.
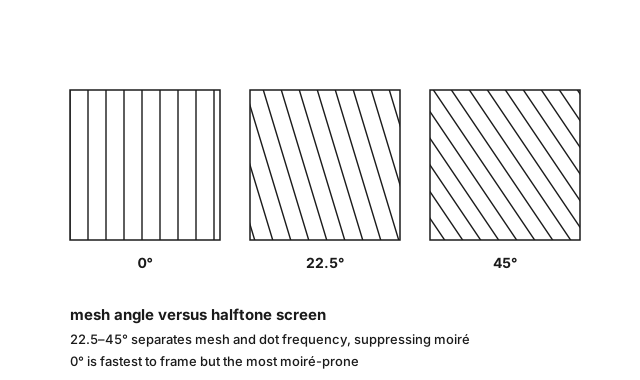
The rule is simple: for halftone work, set the mesh at 22.5–45° to the artwork; for line work and solids, 0° is fine. Straight framing is fastest and wastes least mesh because no bias cutting is needed, but it is the most moiré-prone orientation. Biased framing costs 5–10% more mesh and removes an entire defect category.
Angle also changes directional stiffness. A biased screen behaves more evenly in both axes, which suits round or complex shapes; a 0° screen is noticeably stiffer along one axis than the other, and long narrow prints can show directional distortion.
7 Applications: seven industries
The same machine and the same mesh are different tools in a textile shop and in a PCB shop. Below are usable starting points by industry; fine-tune against the actual ink and substrate.
| Application | Count | Thread μm | Tension N/cm | Critical control |
|---|---|---|---|---|
| Textile printing (plastisol / water-based) | 80–120 | 80–100 | 18–25 | high deposit, thick stencil; elastic substrate, registration from the pallet |
| Garment panels (silicone) | 100–140 | 70–80 | 18–22 | silicone is surface-energy sensitive; mesh cleanliness drives adhesion |
| Packaging and labels | 140–200 | 40–48 | 15–22 | thin film, saturated colour; control screen temperature with UV inks |
| Glass and ceramic | 180–305 | 34–48 | 20–30 | high-temperature inks; prefer stainless to avoid thermal distortion |
| PCB solder mask and silver | 250–400 | 25–34 | 25–35 | stainless plus calendered; tension stability sets line-width consistency |
| Solar cell fingers | 290–360 | 20–25 | 28–35 | very fine lines, high aspect ratio; zero tolerance for creep |
| Membrane switches | 200–305 | 34–40 | 20–28 | thick silver film, consistent sheet resistance; calendered mesh controls thickness |
One pattern in that table is worth noting: count spans a factor of four and a half, from 80 to 360, while tension only moves between 15 and 35 N/cm. Tension is not a contest to see who can pull hardest; it is a narrow window matched to material, thread diameter and frame size. Landing inside the window and holding it steady is worth more than any extreme.
Appendix Formulas and checklists
A.1 Quick formulas
A.2 Unit conversions
A.3 Incoming checklist
Run this list on any incoming mesh or finished screen. It catches most downstream problems before they start.
Companion reading: Screen Printing Defect Atlas (27 failure modes) · Screen Printing Terms Explained (33 terms, Chinese and English)


